In Profile: Silhouette and Collage
Free to teach, adapt and share in your classroom.
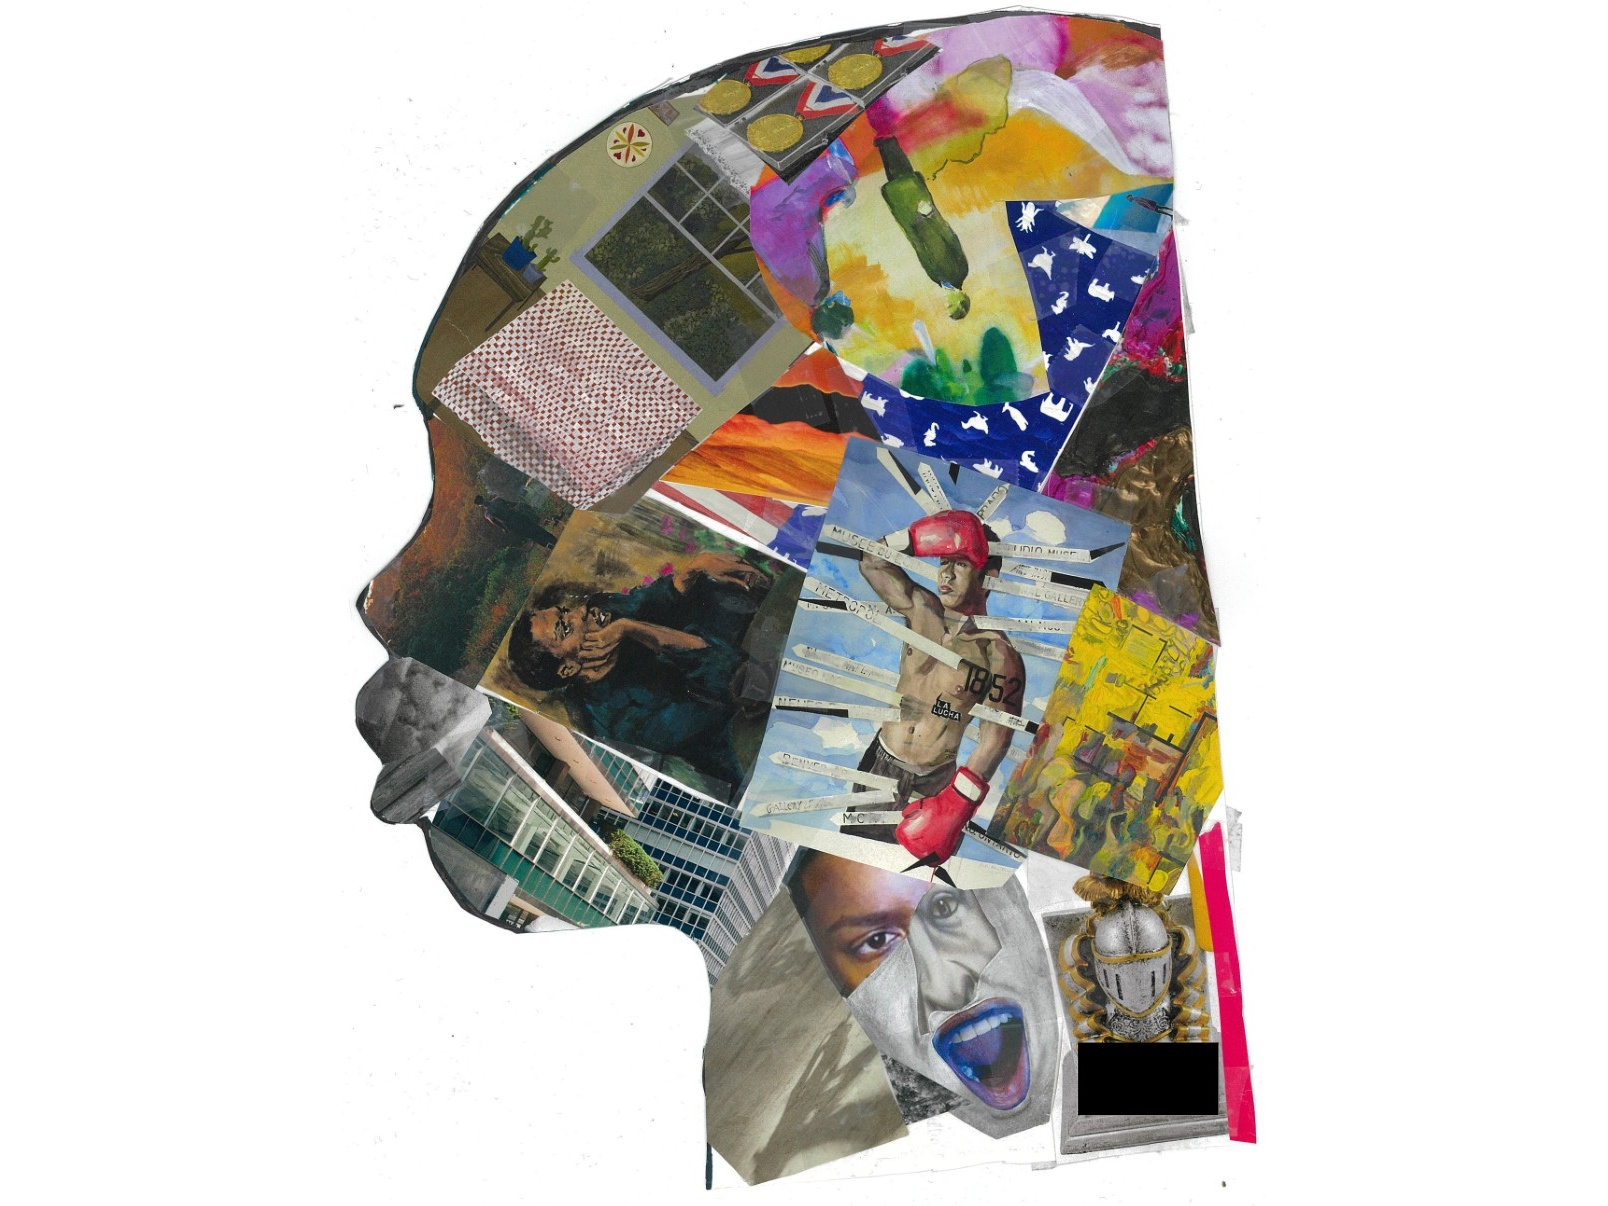
- Grade 6–8
- Subject Visual Arts
- Duration S1–5 → A → refinement → B
- Instructor Mr. George
Overview
Unit Context: Identity and self-portrait · process-based shadow silhouette and collage
Big Idea
A traced edge creates an accessible beginning, not a predetermined portrait. Through paper experiments, shared composition and personal choices, learners decide what they want an image to communicate. Meaning grows through making and explanation together.
A partner traces a shadow, and a learner immediately has an edge to work with. In Profile begins with this physical investigation so that confidence in realistic drawing does not determine who gets to make a meaningful portrait. Learners test paper, build a shared collage and make choices inside their own profile.
The central question is: How do my choices with paper help me communicate something about myself? Students choose what to share. A meaningful portrait can draw on interests, imagined worlds, relationships, moods or hopes without requiring private disclosure.
Grades: 6-8. Instructor: Mr. George. Duration: Sessions 1-5, Session A, repeatable refinement contacts and Session B. The current guide includes 40-, 43- and 45-minute clocks.
In the studio: profile, edge and paper
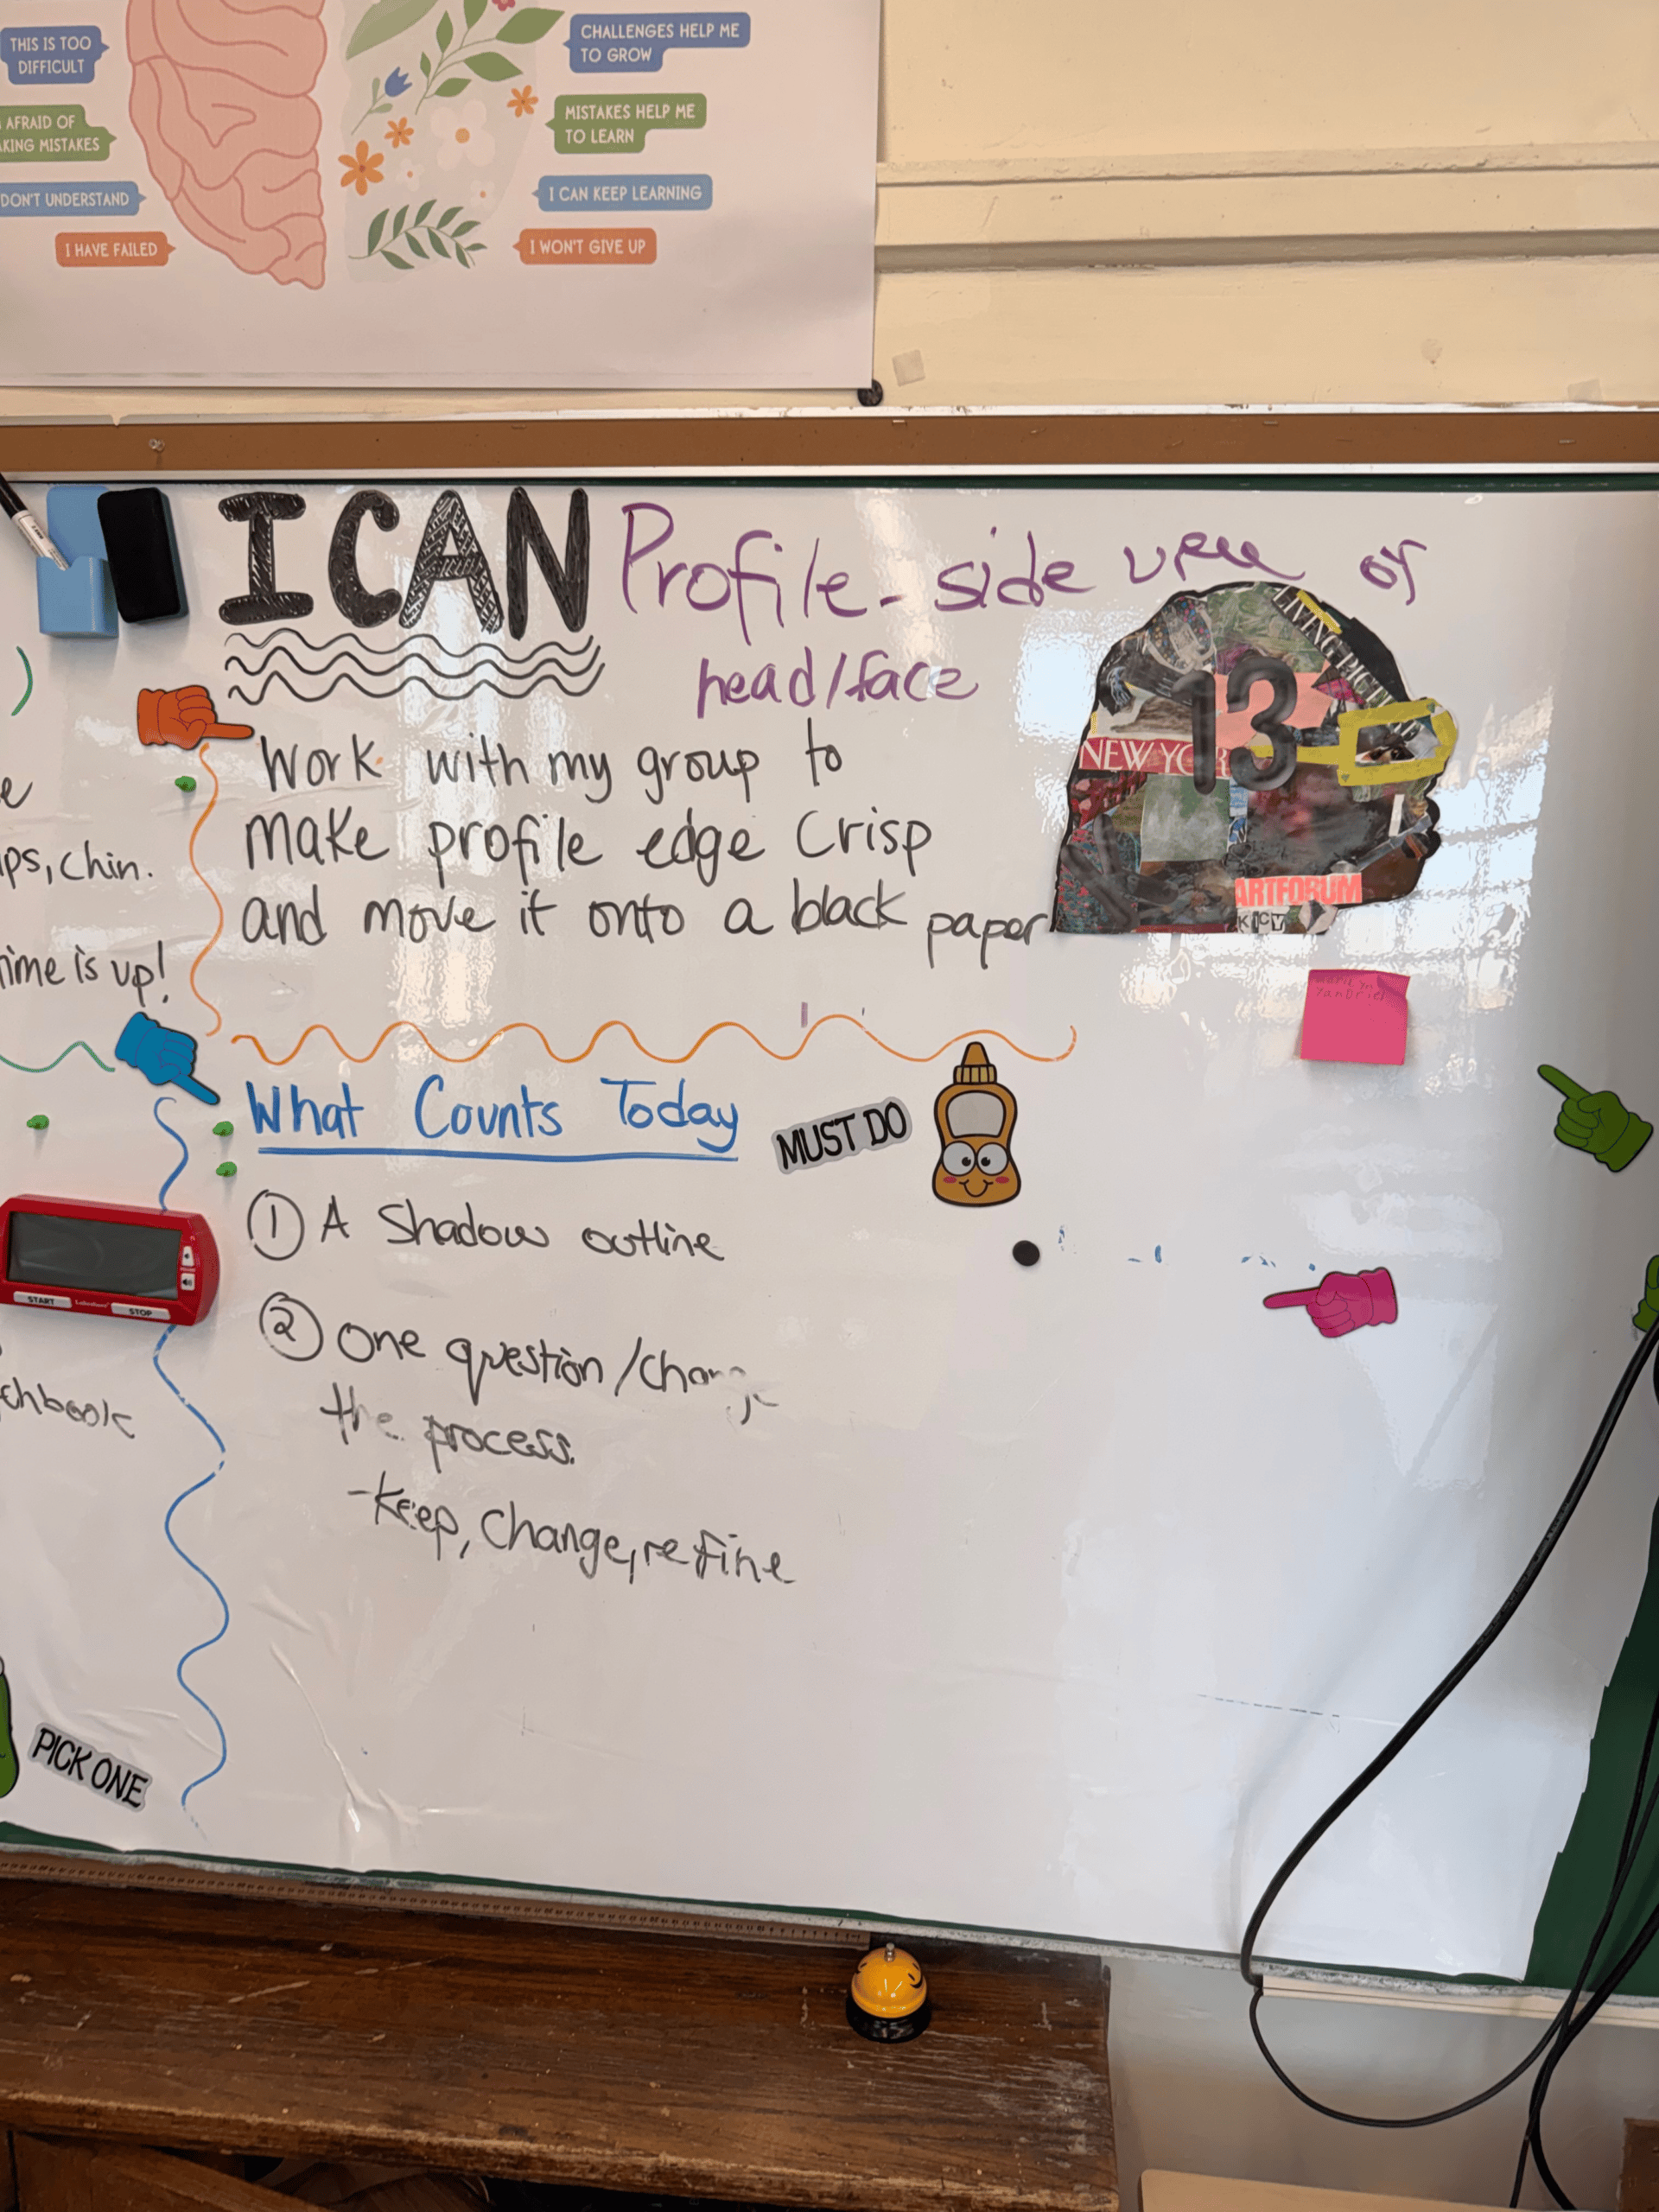
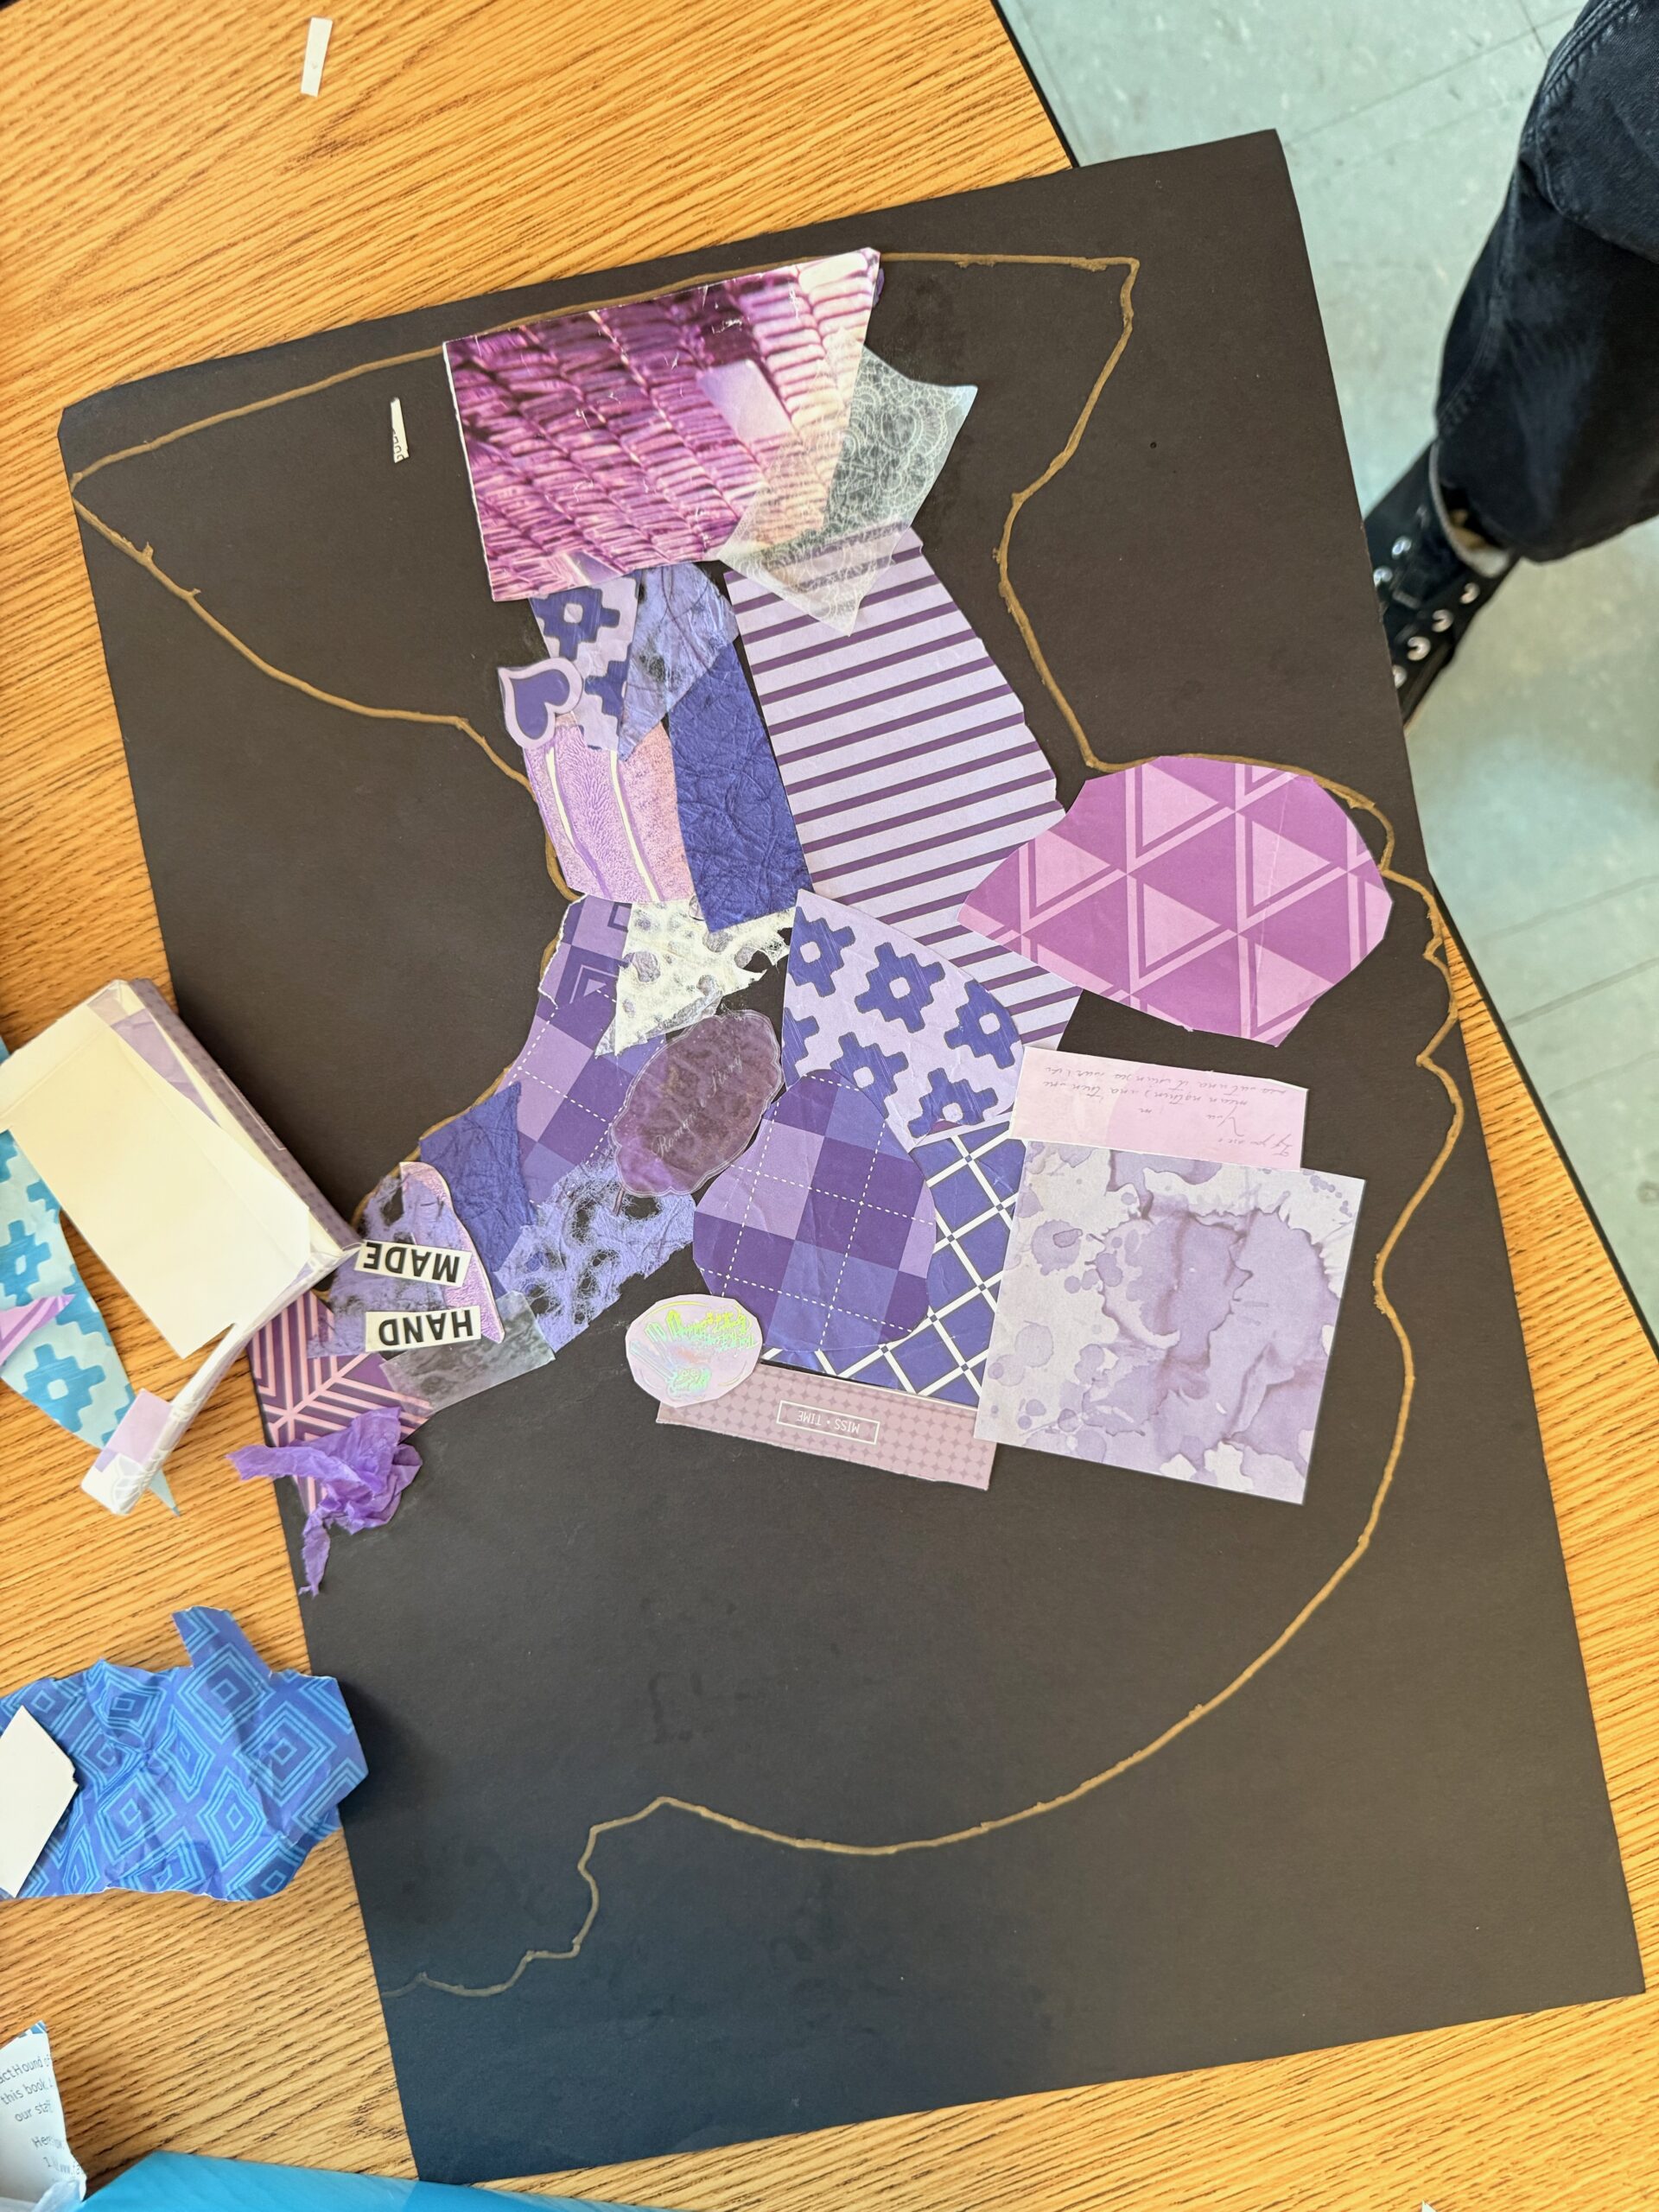
These photographs from the teaching archive connect the shared classroom directions with a developing profile collage. Use them to notice choices, rather than as a single model everyone must copy.
NYS Visual Arts Standards Alignment
- Grade 6 · VA:Cr3.1.6a Reflect on how effectively the portrait communicates meaning and revise when needed.
- Grade 7 · VA:Cr3.1.7a Explain important choices in the portrait through an artist statement or another accessible format.
- Grade 8 · VA:Cr3.1.8a Use relevant criteria to examine the developing portrait and plan purposeful revisions.
The descriptions above are lesson-specific applications of the NYSED Visual Arts performance indicators, not replacement wording for the standards. Use the learner’s enrolled grade to select indicators; access supports do not create a separate lower artistic target.
Instructional Outcomes (Objectives)
- Studio / Experiential Choose and transfer a usable profile edge; change paper; compare placements; contribute to a shared collage; and develop a personal composition within the original outline.
- Cognitive / Analytical Point to a visible choice, explain its relationship to an intended idea, consider another viewer’s reading, and decide whether to revise.
- Evidence Save the portrait, current three-row rubric and developed explanation. Physical tests and spoken or demonstrated choices supply formative evidence; extra worksheets are not required.
Key Vocabulary
- Profile: the side view or outline of a face.
- Collage: art made by combining and attaching pieces.
- Composition: the arrangement of parts.
- Value: lightness and darkness.
- Emphasis: what attracts attention.
Materials & Resources
- Prepare one light tracing sheet, one black 12 × 18 base and an existing holder for each learner. Provide one tested flashlight per active station, pencils, removable tape, scissors, metallic markers, paper scraps and glue sticks. Confirm dry and wet storage before teaching.
- Artist references: Derrick Adams, Self-Portrait on Float; Romare Bearden, The Block; and Bisa Butler, The Safety Patrol. These museum pages provide images and captions for close looking.
Differentiation
- Visual / Fine Motor Offer larger paper pieces, supported cutting and one starting move. The maker directs placement and meaning; assistance is not a deduction.
- Social / Emotional Let students choose what to disclose. Interests, moods and imagined worlds are valid. Ask before touching work or interpreting private identity.
- Multilingual / Communication Accept pointing, labels, oral explanation or dictation. Read recorded words back for the maker’s approval. Sentence count, spelling and English fluency are not extra scoring criteria.
- Re-entry / Continuation Save the exact next action. A learner with an unfinished transfer still joins paper inquiry and group collaboration; provide a separate continuation opportunity.
Anticipated Misconceptions
Misconception A portrait succeeds only when it looks realistic.
Intervention Compare what shape, pattern, value and arrangement communicate. Judge the chosen edge and the maker’s explanation rather than likeness.
Misconception A familiar logo explains itself.
Intervention Ask what the selected word or image means to this maker. A viewer’s recognition is not evidence of personal meaning.
Misconception Every contact requires a new change or a longer statement.
Intervention Use the current rubric and actual work to identify a useful next action. Keep choices that communicate successfully; develop explanations without a fixed sentence quota.
Instructional Sequence
Teach Sessions 1–5, then Session A. Repeat refinement contacts as needed before Session B. The times below preserve the October 26 V12 guide: the first contact is 45 minutes and the earlier S2–5/A/B clocks are 40 minutes. The closing-clock alternatives below cover 43 and 45 minutes. Each session includes its complete timed teaching actions.
- Session 1: Trace the profile
- Session 2: Prepare the metallic outline
- Session 3: Discover what paper can do
- Session 4: Build one group collage
- Session 5: Earlier criteria inquiry
- Session A: Refine the artwork and draft
- Session B: Revisit edit and share
- Repeatable refinement contact
- 40 / 43 / 45-minute planning
Session 1: Trace the profile
Today, I can… work with my group to trace my shadow and explain how we made its edge clearer.
Before you leave… Save your unfolded tracing with name and section on the back. Save your maker question separately. Point to the edge you will keep or retrace and explain the setup change.
What counts today: A chosen shadow outline fits the marked 12 × 18 boundary, or you point out where it needs retracing. You point to a clear or unclear edge and explain the setup change. Save one question. A realistic likeness is not the goal.
Materials today: Large light newsprint; a 12 × 18 sheet or measured template; pencils; removable tape; one tested flashlight per active station; safe wall and chair setup; timer; separate question slips or sketchbooks; routine posters and voice/job slides; tested dry storage. Batteries have been purchased; test each light. Stage transfer supplies for Session 2, not today.
Do Now
Teacher Action: Label the back of the newsprint with name and section. In your sketchbook or on a separate note slip, draw the outside edge of a face from memory for two minutes. Save comparison talk for the outline check.
Teacher Prompt: “Draw the side edge of a face from memory: forehead, nose, lips and chin. Keep drawing quietly until the signal.”
Culture check: Red Zone, level 0. Silent entry and independent drawing. No partner discussion during this three-minute opening.
Rehearse studio routines
Teacher Action: Show entry posters in pairs (30 seconds each), then exit steps (30 seconds). Rehearse Red 0 and Yellow 1 (60 seconds). After accepted agreements, model the Materials Assistant collecting, counting and reporting; one student practices (90 seconds).
Teacher Prompt: “Show me what happens next. Entry stays silent. Yellow Zone is a studio whisper; Red Zone is silent. Watch the materials handoff, then try it. Tell me what is ready and what needs help.”
Culture check: Teacher names each voice change; students demonstrate or speak only when invited. Managers help with tools, not discipline. This is one job rehearsal; preference and rotation practice comes next contact.
Watch and try
Teacher Action: Use a volunteer trio. Turn the sitter sideways, parallel to the wall; aim the beam toward paper, away from eyes. Mark the 12 × 18 fit boundary on larger light newsprint. Adjust the shadow to fit before tracing. Use the previously tested paper, distance and clear walkway.
Teacher Prompt: “How do my choices with paper help me communicate something about myself? Today we choose an outline for collage. You drew an edge from memory. Now we will trace an edge made by light. The sitter decides which outline to use.”
Culture check: Volume 0; tools down and eyes on the demo. Beam stays away from eyes; volunteers rehearse each job.
Go to stations
Teacher Action: Send preassigned trios to numbered stations. Light Keepers collect one flashlight each; teacher dims the room lights to the tested setting.
Teacher Prompt: “Go to your station. Sitter, Light Keeper and Tracer: point to your first job. Keep the walking route clear.”
Culture check: Volume 1; walk with empty hands except the assigned equipment. Teacher checks that the walking path is clear before dimming.
Trace and rotate jobs
Teacher Action: Run three six-minute rounds: 1 setup, 3 trace, 1 sitter check, 1 name the back/change paper/rotate. The sitter checks that the usable outline stays within the marked 12 × 18 boundary.
Teacher Prompt: “Trace one slow edge. Sitter, check your outline and choose what to keep. Name the back, change the paper and rotate jobs.”
Culture check: Volume 1. Light Keeper calls “freeze” for movement; beam stays toward paper. Every student receives a sitter turn.
Check the outline
Teacher Action: Restore lights. Students locate forehead, nose, lips and chin; mark a chosen edge or crop on their own tracing. Use one concise partner check; the maker points to the chosen edge and says keep or retrace.
Teacher Prompt: “What changed in the edge when we changed the setup? Show me. Keep it or retrace? Point to one clear or unclear part and name the setup change that affected it.”
Culture check: Volume 1; each maker handles their own tracing. Ask before changing anyone else’s line.
Ask a maker question
Teacher Action: Save one maker question on a separate slip or in the sketchbook. Invite one student to share the saved question. Keep the question off the cutout before any gluing.
Teacher Prompt: “What question do you want answered before collage? Write it, dictate it or point it out. Next time, this outline becomes a shape you fill. Bring that question.”
Culture check: Volume 0 to think; volume 3 for the speaker. Voice Keeper asks “Who have we not heard from?”
Cleanup
Teacher Action: Save named, unfolded dry tracings and separate questions. Switch off/count lights, remove tape, return chairs, clear tables and floor. Model one Artwork Assistant handoff to the tested storage spot; ask before touching work. Check sketchbook returns only if used. Then: Clean Up Quietly; Stand Together when directed; Line Up By Closet; Exit When Dismissed.
Teacher Prompt: “Save your tracing and question. Light Keepers, switch off and count the lights. Remove tape, return chairs and leave a clear route.”
Culture check: Volume 1; Light Keepers report the flashlight count. Check that named tracings are unfolded and protected at the tested class storage spot, tape is removed, chairs are returned and the floor is clear. Yellow Zone, level 1 for necessary cleanup talk; Red Zone, level 0 before standing and lining up.
Stage before students enter
Test the shadow size and safe light angle at every active station. Preassign trios and a first role; check that the station count supports three six-minute rounds. Confirm storage before tracing. Never shorten a sitter’s turn to make up for an unprepared station.
Art evidence is the visible edge, setup explanation and maker choice. Returning tools, safe movement and storage are studio habits, not portrait-quality criteria.
Exit Ticket / Evidence Check
Point to the chosen edge and explain the setup change; save a maker question separately.
Session 2: Prepare the metallic outline
Today, I can: Choose whether to keep, refine or retrace my edge, then transfer the fitted profile onto black paper.
Save: Your named black base, unglued cutout and the exact step to resume. An unfinished transfer needs continuation time, not an automatic lower art score.
Materials: Named tracing; black 12 × 18 base; scissors, pencil and wipeable chalkboard chalk; masking tape; gold or silver metallic Sharpie; existing holder. One tested retrace station is available only at its verified capacity.
Check the edge and choose a route
Teacher Action: Mark a check at a crisp part and an X at a wobble, break or blur. Choose Keep, Refine or Retrace. Show a partner the worst X and the edge that supports the route.
Teacher Prompt: “Which route do you need? Point to the evidence.”
Culture check: Silent entry, then level 2 at the partner cue. In the final 30 seconds, recall the next move, voice level and existing job.
Model one transfer route
Teacher Action: Show Keep, Refine and Retrace with actual tracings. Refine follows the trusted shadow edge. Cut seated; turn the paper, keep fingers clear and place closed scissors down for the next person. Check all four landmarks and fit before transferring.
Teacher Prompt: “Chalk the placement with the face toward open space. Secure the cutout with two tape loops underneath. Trace around it in gold or silver, then lift and save the cutout.”
Culture check: Level 0 for the model. Metallic ink is permanent. Keep the black base whole; no glue route.
Prepare or retrace
Teacher Action: Work from the chosen route and preserve the original contour. At one retrace station, three students rotate Sitter, Light Keeper and Tracer in six-minute rounds: 11–17, 17–23 and 23–29. Keep the beam toward the paper and away from eyes.
Teacher Prompt: “Stop at your actual step. Save the next action rather than rush.”
Culture check: Level 1. Three retraces are the maximum in an uninterrupted 18-minute cycle; transitions can reduce capacity. Keep the waiting record private. Continue later without removing students from shared S3 inquiry or S4 collaboration.
Save and state the next step
Teacher Action: Name the base and save the cutout in the existing holder. Each maker points to the current preparation step and records the exact action to resume. A ready base has a fitted metallic outline and its saved cutout.
Seven-minute cleanup
Teacher Action: Save the base and labeled cutout; cap and count markers, return tools and useful scraps, and clear the table and floor. Studio Captain checks the reset. Follow the four-step exit inside these seven minutes.
Culture check: Level 1 for necessary cleanup talk; level 0 before standing and lining up.
Exit Ticket / Evidence Check
Show the current transfer step and identify exactly where to resume.
Session 3: Discover what paper can do
Today, I can: Change paper, arrange the pieces and explain what my choices do.
Save: Physical paper tests and a loose arrangement in the existing named holder. A paper change, a tested placement and the maker’s explanation are the evidence. A photo, sketch or extra recording sheet is not required.
Materials: Paper scraps, scissors, a separate black study base and the existing holder. Personal profiles stay stored; glue stays closed. Open the complete Methods of Paper and Collage Materials Page grids and the Allison Platz video in the teaching deck.
Do Now and set up
Teacher Action: Choose two scraps. Bend one gently and notice its edge, surface or bend. Identify the existing holder and keep all useful pieces.
Teacher Prompt: “What is different about these papers? What changed when you bent one?”
Culture check: Level 0. Set out materials before class; do not add a collection activity to this block.
Independent paper tests
Teacher Action: Give four uninterrupted minutes to try a few ways to change scraps. Place each test beside an unchanged scrap. Students choose one discovery to show.
Teacher Prompt: “What changed: the edge, the surface or the shape? Keep your test.”
Culture check: Level 1. Cut seated with fingers clear; put closed scissors down before passing. Students need not complete every technique.
Share discoveries and scan the full paper grid
Teacher Action: 07–08: Invite a few learners to show actual tests. 08–11: Scan every row of the complete Methods of Paper grid. Enlarged fold, rip and cut details help visibility; they do not replace the full grid.
Teacher Prompt: “Which method is like your discovery? Which change could you try with the materials we have?”
Culture check: One sharing voice at level 3; level 0 to listen. Illustrated methods that need other tools remain discussion examples.
Name collage and composition
Teacher Action: Use the deck’s Braque example, Glass and Playing Cards, to connect the experiments to collage. Ask learners to point to a paper edge and an overlap.
Teacher Prompt: “Collage combines and attaches pieces to make art. Composition means where you arrange the pieces. Around 1912, Braque used everyday papers in art.”
Culture check: Keep the introduction brief. Today the pieces stay loose so students can keep testing choices.
Teacher look-for: Distinguish what the paper was like, what the learner changed physically and what placement changes. Offer one starting move or two contrasting pieces when needed, without prescribing a finished design.
Watch pause and try
Teacher Action: Play selected parts of Allison Platz’s 2D Collage Techniques. The full video is 4:17; teacher-selected pauses and student trials must fit this seven-minute block. Use a short excerpt when more practice time is needed.
Teacher Prompt: “Watch the paper move. At the pause, try it with your scraps. Point to what changed.”
Culture check: Use only available, appropriate tools and materials. Keep the results; not every video method is a task to complete.
Scan the full collage grid
Teacher Action: Scan every row of the complete Collage Materials Page. Name choices recognized from the video. Use actual scraps for one quick comparison, such as overlap then separation.
Teacher Prompt: “Which choice can you test now? What changes when the pieces move apart?”
Culture check: The full grid is active teaching content. Enlarged pattern, cutout and pile-up details support visibility rather than replace the grid.
Arrange and test
Teacher Action: Choose tested scraps and make a small loose composition. Move one piece to change overlap, closeness or a gap. Compare the actual pieces, choose the position that works and explain why.
Teacher Prompt: “I changed this paper by ___. I moved this piece ___. Now I notice ___. I kept it here because ___.”
Culture check: Level 1. Keep glue closed. Students may point, speak, dictate or demonstrate. A pencil sketch is optional; there is no separate approval queue.
Partner check and save
Teacher Action: 30–32: Show a partner one paper change and demonstrate a tested placement. Explain the choice and hear what the partner notices. 32–33: Gather the tests and chosen pieces in the existing holder.
Teacher Prompt: “Does my choice show? What do you notice?”
Culture check: Level 2 for the peer response, then level 1 to save. Ask before touching. The teacher collects targeted spoken or demonstrated evidence while circulating.
Seven-minute cleanup
Teacher Action: 33–35: Save the holder and chosen pieces. 35–38: Return useful scraps and closed scissors; sort tiny waste into the correct bin. 38–40: Check table and floor, then follow the teacher’s exit cue.
Culture check: Everyone saves their own paper; existing table jobs help return supplies and check the room. Use level 0 before standing and lining up.
Next: One group artwork using these discoveries. Personal profile planning follows the group experience. Continue any retracing separately so all learners receive the individual exploration and shared looking.
Exit Ticket / Evidence Check
Demonstrate a paper change and compare a tested placement.
Session 4: Build one group collage
Today, I can: Use paper changes and tested placements in one group artwork.
Save: One shared artwork with every maker’s name. Each person points to a contribution and explains what a paper change or placement does. No compulsory sketch or new worksheet is added.
Materials: Groups of 3–4; one separate black group base, scraps, scissors, glue and metallic Sharpies. Keep personal profiles stored. Confirm flat drying space and actual stock before class.
Two scraps one discovery
Teacher Action: Individually choose two scraps. Change one edge or move a piece, point to the effect and keep the pieces.
Culture check: Level 0. Glue stays closed; this first try belongs to each maker.
One technique and an individual try
Teacher Action: Show only the needed part of the Allison Platz video, then pause for a hands-on try. Budget roughly one minute viewing or modeling and four minutes making, including a quick teacher scan. Classes that already watched use a short recall model; introduce the move explicitly for 601 and 602.
Teacher Prompt: “Try the move with your scraps. Show what changed. Keep one useful piece for the group.”
Culture check: If video access fails, model tearing or cutting an edge, then overlap or grouping with available materials. Advance at 08; do not replay the full video inside this block.
Scan both full grids
Teacher Action: 08–09: Scan the full paper-change grid and locate a method like the students’ tests. 09–10: Scan the full collage grid and name a placement choice.
Teacher Prompt: “Composition is how you arrange the pieces.”
Agree on the group goal and contributions
Teacher Action: Use one separate group sheet. Agree on what a viewer should notice first. Every member offers a changed piece and a placement idea. Confirm the existing Studio Captain, Materials Assistant, Artwork Assistant and Timekeeper responsibilities; combine duties for a trio.
Teacher Prompt: “What do we want people to notice? Who have we not heard from?”
Culture check: Current class assignments remain through S6. Do not create a new class-job roster here. Everyone makes, places and explains a piece, regardless of studio job.
Two arrangements together
Teacher Action: With glue closed, place everyone’s pieces on the base. Move the same pieces to compare two actual arrangements. Notice attention, connection and open space. Leave the chosen arrangement loose for the peer check.
Teacher Prompt: “What changed? Which arrangement works for our shared goal?”
Culture check: Level 1. Invite each proposal and keep tools accessible. Temporary work areas are not permanent ownership zones.
A neighboring group checks
Teacher Action: Each maker points to a contribution and explains one choice. A neighboring group offers visible evidence. The makers agree on one thing to keep or change, adjust loose pieces and wait for the glue cue.
Teacher Prompt: “I notice ___ because ___.”
Culture check: Level 2. Ask before touching. Repair comments about people by returning to the work. Every maker remains part of the shared decision.
Check a flat secure join
Teacher Action: Include the full attachment-grid scan and glue model in this one minute. Locate glue on the grid. Demonstrate a thin layer on the back of a scrap, place it, press gently and close the glue. Students test one scrap join.
Teacher Prompt: “Thin layer. Press. Close. Check for flat paper and edges down.”
Culture check: Use scrap paper under the glue. Keep glue away from eyes and mouth. Ask for help with a blocked nozzle.
Attach the decided pieces
Teacher Action: Keep the other pieces in place. Lift one agreed piece, glue its back, return it to the chosen position and press. Work back layers first where needed. Leave choices still being tested loose.
Teacher Prompt: “Does this piece go back where we decided? Keep the next choice movable until you agree.”
Culture check: Level 1. At 31, stop gluing. Save unfinished choices for continuation rather than rush or shorten cleanup.
Each maker explains and names the work
Teacher Action: Each maker points to a contribution and explains a paper change or placement. Add all names and save the group work flat with loose pieces.
Teacher Prompt: “I contributed this piece. I changed ___ so ___. Our placement makes ___ stand out.”
Culture check: Speaking or pointing counts. A partner or teacher may record a brief explanation if needed.
Seven-minute studio reset
Teacher Action: 33–35: Save the shared work flat, with names. 35–38: Cap, count, sort and clear the workspace. 38–40: Check the drying space and follow the four-step exit.
Culture check: Level 1 for necessary cleanup talk, then level 0 before standing and lining up. Keep wet work separate and unstacked; the teacher releases the class after the room check.
Before individual profile planning: Every maker can show one paper change and one placement choice. Continue the group artwork if needed while keeping personal black bases and cutouts stored.
Teacher check: Participation and safe studio habits are recorded separately from art evidence. Bisa Butler remains an optional artist extension outside the 40-minute core; it does not displace the hands-on try or full grids.
Exit Ticket / Evidence Check
Each maker points to a contribution and explains its effect in the shared composition.
Session 5: Earlier criteria inquiry
Today, I can: Help write our class criteria, then test my papers inside my profile.
Save: Earlier class findings and a loose arrangement. For the current close, the October 21 three-row student rubric is the sole scoring sheet; use Session A and B next.
Materials: Personal black profile and saved cutout, paper bank from S3–4, pencil, scissors and criteria card. Make the complete large-image exemplar study set available to each trio. Images lead; only small thinking prompts accompany them. Do not shrink the work to fit large questions or answer lines. Keep current jobs through S6.
Current assessment boundary: The criteria-writing activity below is retained as the earlier inquiry. Its four class findings are not a second grading instrument. The October 21 three-row student rubric remains the sole scoring sheet for the current close.
Three papers one profile
Teacher Action: Lay three papers on the black profile with no glue. Work silently first, then tell a partner which paper makes the profile feel most like you and why. Learners without a prepared profile use practice paper and keep a continuation next step.
Culture check: Level 0, then level 2 at the teacher’s cue. The maker chooses what to share; meanings are not universal color rules.
Derrick Adams and a first look
Teacher Action: Show Self-Portrait on Float from the deck. Ask where the eye lands first and which paper choice sends it there. Keep the response tied to visible choices rather than guesses about private life.
Culture check: Level 0 to look, then level 2 for a brief response. Bearden’s The Block stays at the end as a next-unit reference.
Study profiles in trios
Teacher Action: 06:00–06:30: Show the J, S and R overview for a silent look. Keep the complete large-image set available, including K, E detail and BB word detail for comparison. Give each trio a focus exemplar, alternating J, S and R. 06:30–10:00: Discuss the three prompts while pointing to visible evidence. 10–12: Speakers report one finding per focus exemplar so the whole class draws on the complete set.
Teacher Prompt: “What did they include? What does it say about them? Which collage move makes you notice it: edge, light and dark, pattern or overlap?”
Culture check: Recorder keeps concise findings on an existing note space; no printed answer lines are needed. Speaker shares; Voice Keeper invites every voice. Use level 0 for the look, 2 in trios and 3 for one sharing voice. Suggested meaning is an interpretation, not a known fact about the former student.
Look-fors: J combines selected objects with “I CREATE, THEREFORE I AM” and keeps pieces inside a strong outline. S uses blue and purple papers, pattern and light/dark relationships with little text; show its two parts together. R uses layered images and red gloves that attract attention. Ask what the visible choices support; do not supply a biography.
Image use: Use the visible artwork as evidence. BB’s word detail supports discussion of chosen words; it does not establish cultural identity. Real student and teacher work supplies finished-product examples. Process diagrams do not document a former student’s decisions.
Students write the criteria
Teacher Action: 12–14: Each trio turns one finding into “A strong profile collage …” and points to an example in the full set. 14–16: Speakers read; Recorders post. 16–17: The class merges matching ideas and chooses four. 17–18: Score J together by showing how many agreed criteria it demonstrates; one student points to evidence.
Teacher Prompt: “Which example proves your criterion? Which wording would catch a page of logos glued down for no reason?”
Culture check: Grade 6 begins with “Every piece I keep says something about me” and writes three more. Grades 7–8 write all four. Read the students’ wording aloud rather than replace it with a ready-made list. Copy the agreed wording onto the reusable card. The full set remains available while the class compares possible criteria.
The logo test
Teacher Action: Use the prepared E detail to ask which labels might say something about the maker and which need explanation. Apply the same test to every brand name or logo a student keeps.
Teacher Prompt: “This shows I ___. Can’t finish it? Swap it for paper that can.”
Culture check: Level 0 for the brief model. A viewer cannot know the maker’s intention just from recognizing a label. Words and logos meet the same class criteria as other pieces.
Test papers inside the profile
Teacher Action: Arrange the actual loose pieces, move one piece and check the result against the agreed criteria. Keep all collage inside the original traced outline and keep the contour visible. Trim individual paper pieces away from the artwork; never cut away or reshape the profile.
Teacher Prompt: “What changed when you moved it? Which criterion does that choice show?”
Culture check: Level 1. No required sketch, arrangement map or meaning-key sheet. The saved cutout can help check the original contour. Glue stays closed.
A partner checks the dry fit
Teacher Action: The partner identifies a criterion and points to evidence. The maker says whether that matches the intended meaning. For a logo, the partner asks what it says about the maker. The maker decides what to keep or retest.
Teacher Prompt: “Say that back about the work.”
Culture check: Level 2. Ask before touching. The original contour is a taught construction requirement, not a new rubric strand or hidden penalty.
Save a next step
Teacher Action: On the card, finish “My arrangement shows criterion # ___ here.” Identify the first piece to glue next contact. Save every piece loose in the existing holder.
Seven-minute studio reset
Teacher Action: 33–35: Save profile, loose pieces and card. 35–38: Cap, count, sort and clear the space. 38–40: Check the next-step note and follow the exit cue.
Culture check: Level 1, then level 0 before standing and lining up. No gluing is added to cleanup.
Exit Ticket / Evidence Check
Point to evidence in a loose arrangement and save the next action without adding another score.
Session A: Refine the artwork and draft
Today, I can: Use the rubric and visible choices in my portrait to develop my artwork and explain what it communicates.
Save: Portrait, existing rubric and a meaningful statement draft with a next step when needed.
Materials: Existing rubric/sketchbook and pencil at entry. Distribute portraits and holders during the opening. Open an authentic artwork for the explanation model. Keep paper and tools available for needed refining; confirm flat drying space.
Independent idea prompt
Teacher Action: Students write, label or sketch on the rubric reverse or in the sketchbook: What is the main idea I want someone to notice first? Distribute portraits and holders while they work.
Teacher Prompt: “Choose what you want someone to notice. Begin quietly with your pencil.”
Culture check: Red Zone, level 0. Entry needs no project materials and no teacher-led launch.
Review the rubric and board prompts
Teacher Action: With actual portraits visible, review the October 21 rubric and post the short checklist below. Students point to evidence and decide what needs attention; no track or fixed change quota is assigned.
Model a specific explanation
Action and Say: Show real Exemplar J and point to “I CREATE, THEREFORE I AM.” Label this as a hypothetical teacher-written explanation: “I chose these words because making art matters to me.” This is a possible model, not the original student’s words or known intention. Model developing another relevant visible choice and its connection to the idea. Students explain their own actual meanings; no fixed sentence count is set.
Board checklist
Look at the rubric. Point to evidence in your artwork. Choose what needs attention. Work on your art and explanation. Check again.
Teacher Prompt: “Use the rubric to decide what your work needs. Your words may help you see something to refine, and your paper choices may give you more to explain.”
Culture check: No track assignment, Row 3 gate or fixed number of changes. If the work meets the criteria and communicates the maker’s intention, keep those choices. Support students to point, talk, label or dictate.
Refine and explain together
Teacher Action: Students work beside their actual portraits and rubric. Finish meaningful fill or refine areas that need attention. Begin a statement while making; move between the artwork and the draft as each helps clarify the other. Keep the original profile intact and trim scraps away from the work.
Teacher Prompt: “What are you communicating? Which choices help someone see it? Explain what matters about those choices.”
Culture check: Yellow Zone, level 1 for making. The teacher supports the evidence check without assigning fixed ability groups. Keep glue away from eyes and mouth; cap it between uses.
Develop the explanation
Begin with the idea the maker chooses to share. Identify specific paper choices visible in the portrait and explain how they support that idea. Useful details may include an image, color relationship, arrangement, texture or selected words; students choose relevant evidence.
A full explanation develops the thinking. It has no fixed three-sentence limit and no compulsory “I tested” sentence. Describe a real change if it helps explain the work; do not invent a test or require a finished maker to find a flaw.
Use Show and explain and the rubric reverse, or continue in the existing sketchbook. Students may write, label or dictate; read recorded words back for approval. If drafting orally, save the actual words through a scribe or an available recording so there is a draft to revisit next contact.
Culture check: Level 1 for sustained work. Offer brief teacher or peer support when useful, with the maker’s permission. No timed critique or Voice Keeper protocol is required during this close. Students decide what personal meaning to share.
Teacher look-for: The maker uses rubric evidence to choose useful work and develops an explanation grounded in the portrait. Writing length, spelling and English fluency do not become additional art-scoring criteria.
Reread and save
Teacher Action: Reread or listen to the draft beside the artwork. Identify what is already explained and what needs attention. Save the draft and a useful next step. Continue with a refinement contact as needed; Session B does not automatically follow at the next meeting.
Teacher Prompt: “What do your words help someone understand about your paper choices? What will you return to next time?”
Culture check: Level 2 for the check; one sharing voice at level 3, listeners at 0. Record studio habits separately from art quality.
Seven-minute reset
Teacher Action: Save the rubric and loose pieces. Keep wet work flat and separate in the drying place. Cap/count tools, return useful scraps, clear table and floor, push chairs in, and follow the established four-step exit.
Teacher Prompt: “Save your draft and next step. Wet work stays flat.”
Culture check: Level 1 for necessary cleanup; level 0 before standing and lining up. No stacking or covers against wet glue.
Exit Ticket / Evidence Check
Reread or hear the statement beside the portrait. Identify what the words explain and what needs further work.
Repeatable refinement before Session B
Repeat this contact between A and B until sustained final revision, editing and a meaningful gallery are realistic. Reuse the existing statement; do not require a full rewrite each time.
Quiet thinking
Teacher Action: Offer a quiet sketchbook thought while portraits arrive.
“What idea do you want a viewer to notice?”
Look at actual work
Teacher Action: Place the portrait beside the October 21 rubric. Point to evidence before deciding what needs attention.
“Which visible choice supports your intention?”
Partner talk
Teacher Action: Offer a brief partner conversation about meaning and visible choices. Ask before handling work.
“What do you notice, and where do you see it?”
Targeted writing
Teacher Action: Update a specific explanation or label where meaning needs clarification. Record dictated words and read them back.
“Explain this choice, not an invented process.”
Sustained refinement
Teacher Action: Make or revise beside the statement. Confer from the maker’s intention and evidence; retain successful choices.
“What useful next move would help your idea communicate?”
Check and save
Teacher Action: Compare art and words; save a precise next action and the existing statement.
“What will you return to next time?”
Protected cleanup
Teacher Action: Keep wet work flat and separate; save rubric and draft, cap and count tools, clear surfaces and floor, and follow the class exit routine.
“Save the thinking with the artwork.”
Exit Ticket / Evidence Check
Point to a choice, explain its meaning, and name a useful continuation action. Readiness for B comes from the actual work and explanation, not a fixed deadline.
Session B: Revisit edit and share
Today, I can: Develop my explanation with specific evidence, edit for clarity and share what my artwork communicates.
Save: The same rubric, developed statement, title and viewer responses. Self-assess the artwork before teacher scoring; keep the October 21 descriptors unchanged.
Materials: Existing draft/rubric or sketchbook and pencil at entry. Distribute portraits and holders during the opening. Prepare a clear tabletop viewing route. Keep tools available for genuinely needed final artwork refinement.
Reread the draft independently
Teacher Action: Reread or listen to the saved draft and underline unclear wording while portraits arrive. Keep the opening independent. Evidence checks and self-scoring wait until the actual artwork is in front of the maker.
Teacher Prompt: “Reread your draft. Mark a place that could be clearer. We will check the words beside the artwork when it arrives.”
Culture check: Red Zone, level 0. Do not score from memory before the portrait arrives. Makers decide what personal meaning to share.
Revise meaning and specific details
Teacher Action: Place the draft beside the actual artwork. Reread for meaning: does it explain the maker’s idea and show specific supporting choices? Add useful details, reorganize or remove unclear wording. Refine the artwork only where the rubric and intention show a need. Keep most of this time for sustained revision.
Optional support: Compare “I chose these words” with the hypothetical teacher model “I chose these words because making art matters to me.” The added reason connects a visible choice to an idea; correcting spelling improves readability. Neither sentence is attributed to the former student. Ask: “What meaning does your own choice have for you?”
Culture check: Yellow Zone, level 1. Brief support is available without a required partner circuit. Students may retain successful choices; no exactly-one-fix quota. If substantial fill remains, provide continuation time rather than rush the art or shrink the gallery.
Self score edit and title
With the actual portrait visible, self-score the three October 21 rows and point to evidence; teacher notes follow. Then edit wording, spelling or punctuation as useful for readability and choose a title that suits the developed explanation. A current score can be revisited if the work is still developing.
Culture check: Students may talk, write, label, point or dictate. A full explanation has developed meaning and supporting details, not a prescribed number of sentences. Clarity editing supports communication; writing mechanics and English fluency are not new artistic scoring demands.
Flat tabletop setup
Teacher Action: Leave the portrait flat at its own seat with title, statement and rubric evidence. Keep any recently glued work in place and unstacked; viewers will move around it.
Teacher Prompt: “Keep the art flat. Leave the words beside it.”
Culture check: Level 1. Keep a clear walking route and hands off others’ art. No wet artwork is passed between students.
Ten-minute gallery
Teacher Action: Look carefully at the artwork, then read or hear its explanation. Notice a specific paper choice and what the statement helps you understand. Leave one thoughtful response in a clear area of the rubric reverse, or respond orally with support. Keep earlier writing untouched; there is no quota of response slips.
Teacher Prompt: “I notice ___ in the artwork. The explanation helps me understand ___.”
Culture check: Level 1. Comment on visible choices rather than guessing private facts. Ask before writing on the maker’s sheet. A note placed beside the artwork is an optional access support, not another required worksheet.
Compare intention and viewers
Teacher Action: Makers read or hear viewer responses. Compare what the artwork communicated with what the explanation clarified. Identify a useful insight or an area to revisit; there is no obligation to alter successful work.
Teacher Prompt: “What did the artwork communicate? What did your explanation help viewers understand?”
Culture check: Level 2 for partners, then one voice at level 3 and listeners at 0. Different readings can be useful; the maker retains the decision.
Seven-minute reset
Teacher Action: Keep rubric, statement and responses together. Dry work returns flat to the tested class crate when it fits without bending. Wet work remains in the separate drying space. Return tools, clear tables and floor, push chairs in and follow the four-step exit.
Teacher Prompt: “Save your evidence and what viewers noticed. Keep the work flat.”
Culture check: Level 1 for necessary cleanup, then level 0 before standing and lining up. Artwork Assistant asks permission before helping; teacher releases the class.
Exit Ticket / Evidence Check
Compare the intended meaning with viewer responses. Keep portrait, rubric, statement and responses together.
40 / 43 / 45-minute planning
- Session 1 · 40-minute alternative Only after routines and jobs have been rehearsed: 00–02 draw; 02–05 retrieval review; 05–10 model; 10–12 move; 12–30 three six-minute tracing rounds; 30–31 outline check; 31–33 maker question; 33–40 cleanup. If safety teaching needs longer, continue the project next contact.
- Session A · 43 minutes Keep 00–08 opening/model; make and draft 08–33; reread/save 33–36; reset 36–43. 45 minutes: make/draft 08–35; reread/save 35–38; reset 38–45.
- Session B · 43 minutes Reread 00–04; revise 04–17; self-score/edit/title 17–21; setup 21–23; gallery 23–33; reflect 33–36; reset 36–43. 45 minutes: revise 04–19; self-score/edit/title 19–23; setup 23–25; gallery 25–35; reflect 35–38; reset 38–45.
- Refinement · 43 / 45 minutes Keep the 00–12 opening cycle. Extend making to 33 / 35, save through 36 / 38, and protect the final seven minutes. Preserve the established eight-minute weekly inquiry in an appropriate continuation contact; carry unfinished project work forward.
Closure & Formative Assessment
- Current scoring: Use the unchanged October 21 rows: Something about you; Creativity and moods; Fill the entire profile. Self-assess beside the actual portrait before teacher scoring.
- Formative evidence: Observe paper tests, placement comparisons, meaningful choices and explanations. Earlier criteria cards and the Traveling Rubric are not additional scoring requirements.
- Keep separate: Safe movement, tool care and cleanup receive studio-habit feedback. Writing mechanics and support needs do not replace artistic evidence.
Downloads & Teaching References
Download the 27-page In Profile Teacher Toolkit. The full teaching sequence is above; the PDF remains available for print use.
Sequence source: In Profile Classroom Guide V12, current close revised October 26. Prepare the complete paper-method, collage and attachment grids from the teaching deck and the large-image exemplar set. If video access fails, demonstrate with the actual materials. Derrick Adams supports Session 5; Bisa Butler is an optional extension outside the core clock, and Bearden’s The Block is a next-unit bridge.